Content
In a private yard, a barn is needed as a storage room or for keeping animals. Often this utility structure is erected from used materials or what is left after the construction of the house is used. The size and design of the barn is determined by its purpose. Suppose, for storing inventory, it is enough to build a small cold utility block, and you need to keep a large number of poultry in a spacious insulated building. Now we will look at how to build a shed with our own hands from wood and foam block, and also present several options for the drawings of the farm building.
Determining the location of the barn
The place to install the barn is usually chosen further from the residential building. It is desirable that this be a hill, otherwise the utility block will constantly be flooded during the rain. In general, before choosing a place for construction, you need to look at projects at least on the Internet, and then decide on the purpose of the farm building.
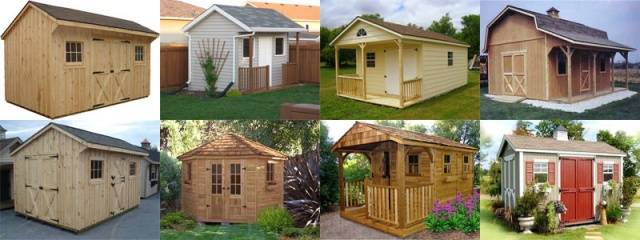
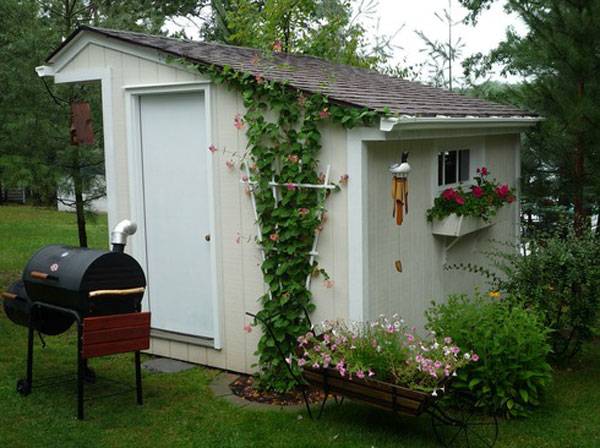
The photo shows examples of beautiful utility units for storing inventory. Such a building can be installed in a conspicuous place. She will even become a decoration of the site. You just need to try to make the decoration of the barn so that it is combined with the architectural ensemble. If it is supposed to make a barn from blocks or used materials in order to breed a bird in it, then such a building must be hidden further from public view. In addition to the fact that the barn with its appearance will spoil the interior of the yard, an unpleasant smell will come from the bird.
Barn projects examples
Before building a shed with your own hands, you need to draw a drawing. The diagram indicates the dimensions of the future building. This will help you calculate the required amount of material. However, even before drawing up a project, you need to decide on the target direction of the barn. For example, a capital construction requires more capital investment and labor costs, and a temporary utility block can be quickly assembled from scrap materials.
It is important to decide on the roof of the utility block. A single or gable roof can be installed on an outbuilding. Each roof option requires certain financial investments, skills, labor costs. If you need a poultry room, firewood storage, toilet or outdoor shower, it is wise to get a combined building.
The choice of material depends on the target direction of the utility block. Sheds are usually built from bricks, wood or foam blocks. Further, we offer several projects for outbuildings. Maybe you will like some of them.
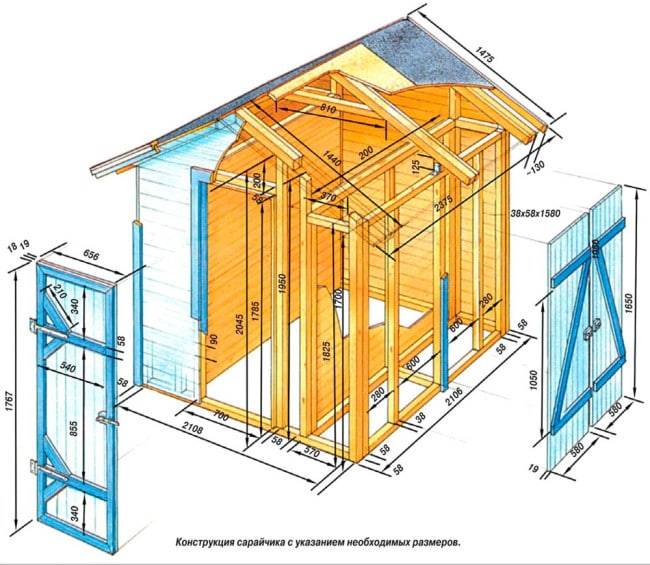
It is difficult for an inexperienced person to draw up a drawing of a utility block on their own. This photo suggests a project frame shed with a gable roof. Collect it according to the specified dimensions, if the dimensions of such a building suit you.
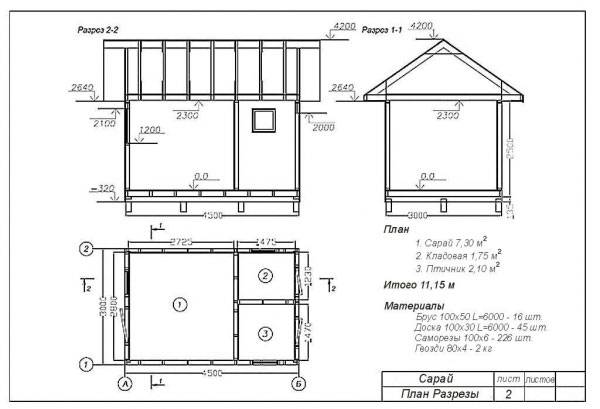
According to the next project, we are assembling a frame utility block, divided into three compartments. Inside, you can organize a poultry house, pantry, woodshed, summer kitchen or other premises as needed.
When it is decided that we are building a barn only for livestock, you can use the following proposed project.
You can organize an outdoor shower, toilet or pantry in a small utility block. It can be assembled according to the provided drawing of the frame building.
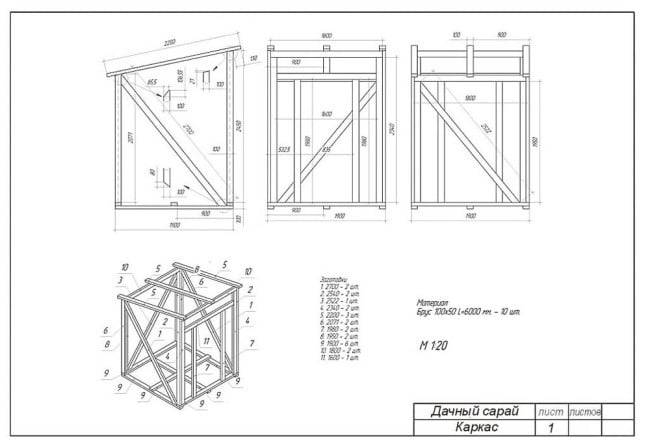
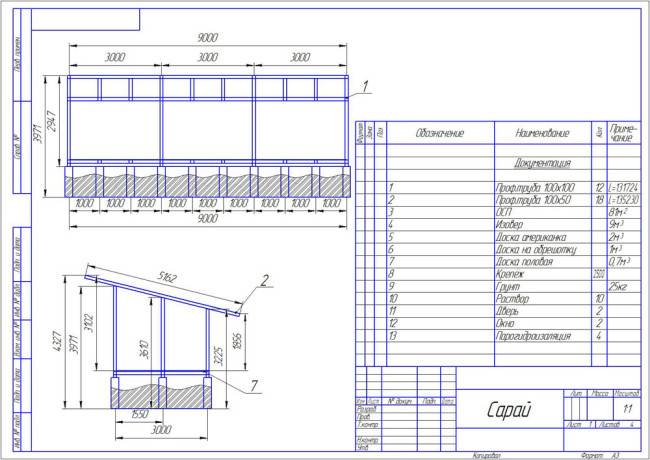
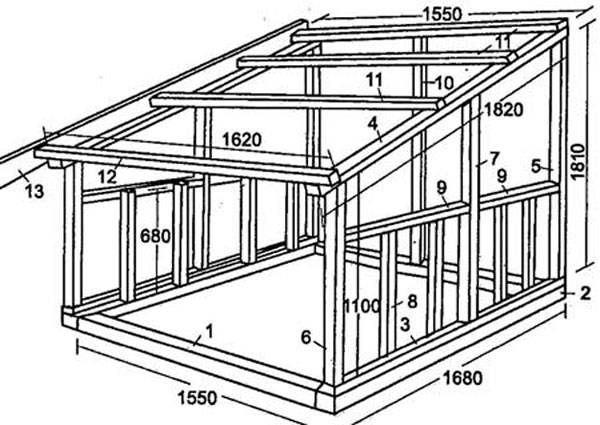
All temporary sheds are best assembled using frame technology. A general view of the structure is shown in the photo.The dimensions of the frame can be left or you can calculate your own.
Determining the type of foundation for the barn
The choice of the type of foundation depends on which building will be built. Heavy sheds with brick or block walls are built on concrete belts. It is reasonable to put frame hozblok on a columnar base. Now we will take a step-by-step look at how to make our own foundation for your shed.
Strip foundation for utility block
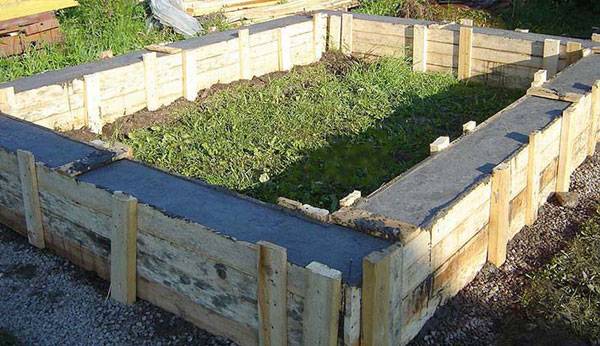
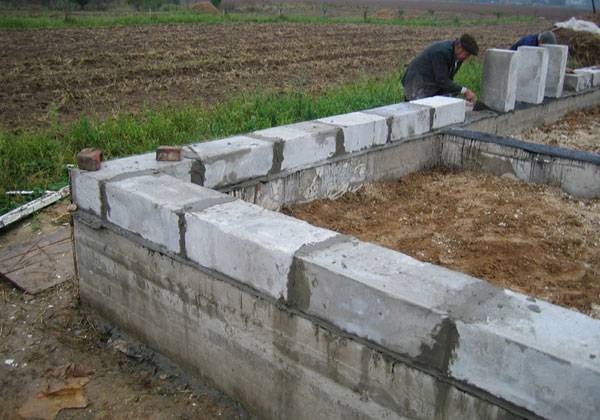
Reinforced concrete tape can also be poured for a frame shed. Although for such buildings it is reasonable to equip such a solid foundation with their large dimensions. Pouring a concrete tape requires a lot of labor and financial investment. Usually such a base is made for brick or block sheds.
A step-by-step guide for erecting a concrete tape for a utility block looks like this:
- The contours of the future foundation are marked on the site. For a shallow base, dig a trench 40-50 cm deep. If soil swelling is observed, then the depth of the trench is increased to the level of freezing of the soil. Usually, a depth of up to 80 cm is enough. The width of reinforced concrete tape for a frame utility block is taken in the range of 25-30 cm. For brick and block sheds, the width of reinforced concrete tape is made 100 mm more than the thickness of the walls.
- The bottom of the trench is covered with sand and crushed stone 15 cm thick. Formwork equal to the height of the basement is collected from the boards. It is installed on top along the perimeter of the trench, and the bottom and side walls are covered with roofing material. If the height of the formwork is more than 50 cm, the side walls are reinforced with temporary supports. Particular attention should be paid to strengthening the corners.
- In order for the tape to have good resistance to bending, a reinforcing frame in the form of a box is assembled inside the trench. Reinforcement with a thickness of 12 mm is tied with a knitting wire. You cannot weld rods.
- Pouring the tape for the barn is performed in one day, otherwise a monolithic base will not work. It will take a lot of mortar preparation, so it is better to use a concrete mixer.
In at least two weeks, the concrete will gain about 70% strength. On such a foundation, you can already begin to put the walls of the shed.
Column base for utility block
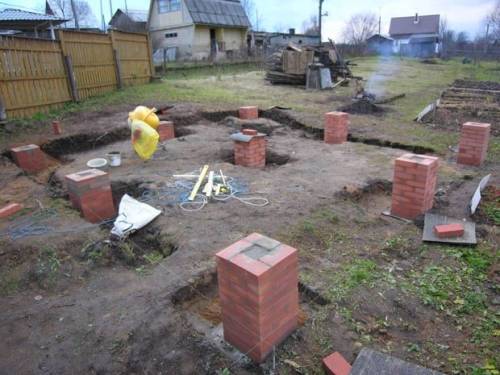
When building small frame sheds, a columnar foundation is most often installed. The curbstones are able to withstand light construction and do not require a lot of building material.
Let's look at the step-by-step steps for performing work when laying red brick pedestals:
- Adhering to the markings, they dig holes with a depth of 70 cm. They must be placed at the corners of the future building in increments of a maximum of 1.5 m. If the width of the utility block is more than 2.5 m, then intermediate pedestals are additionally provided.
- At the bottom of each hole, a 15 cm layer of crushed stone with sand is poured, after which red brick laying on concrete mortar begins.
Having built all the pedestals, make sure that they are on the same level. If necessary, low pillars are built up with concrete mortar.
For the construction of pedestals for a frame utility block, you can use hollow concrete blocks. For them, holes are dug at a step of 1 m. The step-by-step instructions for laying blocks are no different from working with bricks. Only the voids in the blocks during masonry need to be filled with mortar.
Concrete blocks can additionally be placed under the floor beams of the utility block. They will not allow the floor to bend when exposed to heavy loads.
Columnar wooden foundation for a temporary enclosure
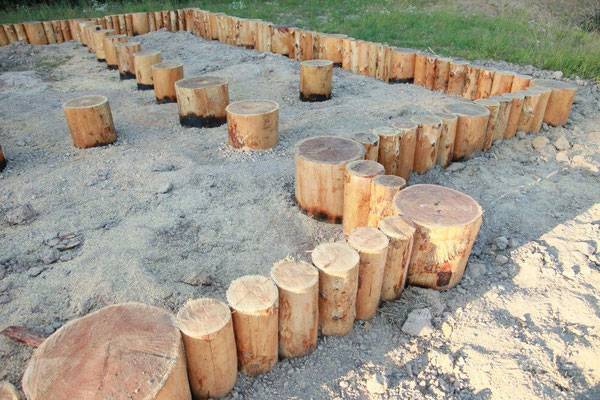
Any person who built temporary huts for household needs did not lay a strong foundation for them. So for our utility block, you can build a foundation of logs. If the workpieces are well treated with waterproofing, then such a temporary hut will last up to ten years.
Let's see how the step-by-step laying of such a foundation occurs:
- Of the materials, you will need larch or oak logs 1.5-2 m long with a diameter of 30 cm. That part of the pillars that will be in the ground is treated with bitumen, and wrapped on top with two layers of roofing material.
- Holes are dug under the logs. The bottom is covered with a 150 mm layer of crushed stone or gravel. All logs are installed in the holes, after which the gaps are simply pushed with soil. It is allowed to fill the pits with concrete or fill them with a dry mixture of sand and cement.
The lower trim of the frame shed is simply nailed to the wooden foundation.
Instructions for the construction of a frame shed
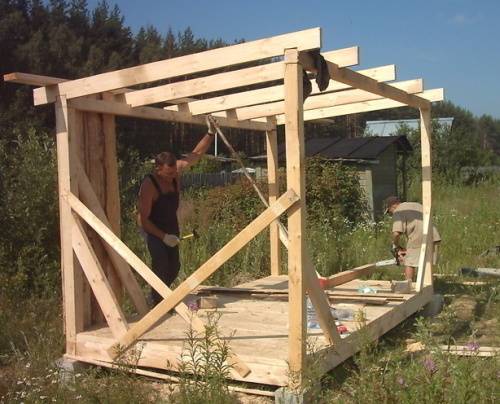
First, let's look at building a barn using frame technology. Even one person can handle such work.
So, guided by the project, we proceed to the construction of a frame shed:
- First, from a bar with a wall size of 100x100 mm, you need to assemble the main frame of the utility block. The frame racks will be attached to it. To connect the elements at the corners of the frame, at the end of the timber, cuts are made to half its thickness, that is, 50 mm.
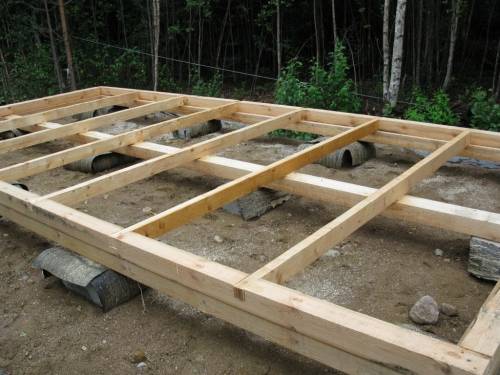
- Regardless of the design, the foundation is covered with two sheets of roofing material. The frame of the utility block is nailed to the wooden base with long nails. To the concrete tape, fixation takes place with anchor pins.

- Now you need to fix the lags to the frame. A board with a section of 50x100 mm is laid with a step of 600 mm. The upper edge of the log should be flush with the surface of the frame, otherwise it will be difficult to lay the floor in the barn. The insulated barn requires a double floor. To make it convenient to knock out the beams from below with a board or OSB, do not rush to fix the frame to the foundation. The entire structure can be secured after the sub-floor is attached.
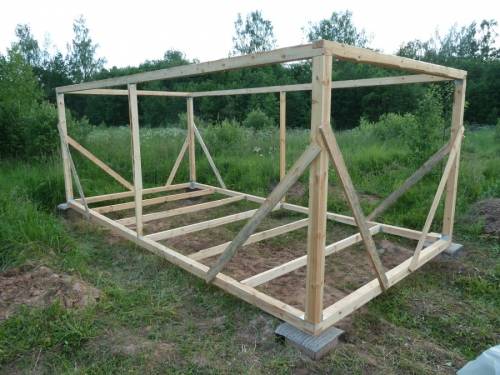
- When the lower frame of the utility unit is already securely fixed to the foundation, they begin to install the racks. They are made from a bar of the same thickness. Optimally, in front of the shed, where the entrance door will be, install racks with a height of 3 m, and at the back - 2.4 m. The difference in height of 600 mm will allow organizing the slope of the shed roof of the utility block.
- Racks are placed at the corners of the frame, at the locations of partitions, door and window openings, as well as exactly along the wall in increments of a maximum of 1.5 m. The workpieces are attached to the frame with metal mounting angles. For the rigidity of the frame, all racks are reinforced with jibs, which are installed at an angle of 45about... The instability of the frame can be reduced by installing temporary backups.
- In the places where the door frame and window frame are installed, horizontal lintels are nailed. The upper harness is attached to the posts with the same mounting angles. The frame is assembled from a beam of a similar thickness, because the entire roof will be held on it.
- Now it was the turn of the shed floor beams. They are made from a board with a side size of 50x100 mm and laid with a step of 600 mm. At the back and front of the frame, the beams should form an overhang of about 500 mm wide.
- A crate is nailed on top of the logs. For solid roofing, a sparse lathing made of non-edged boards with a thickness of 25 mm is used. A solid base of plywood or OSB is made under a flexible roof.
On this, the skeleton of the frame shed is ready. Now it remains to sheathe it with a board or clapboard, lay the floor and lay the roofing chosen by the owner.
In the video, the manufacture of a frame structure:
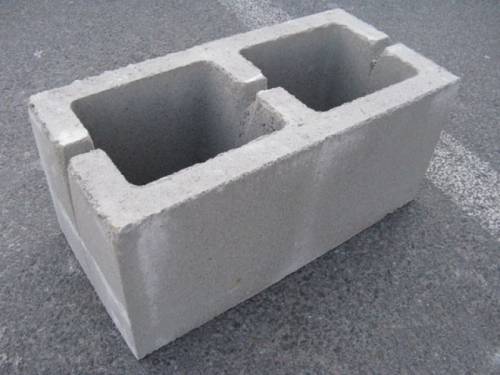
Instructions for building a shed from foam blocks
Recently, for the construction of sheds, foam blocks have begun to be used more often than brick. The popularity of the material is due to its low weight, good thermal insulation performance, and the ability to "breathe". Foam blocks are larger than bricks in size, which speeds up the process of laying the walls of the barn. It should be noted that the blocks have several varieties that differ in their composition. The characteristics of the material can be seen in the table.
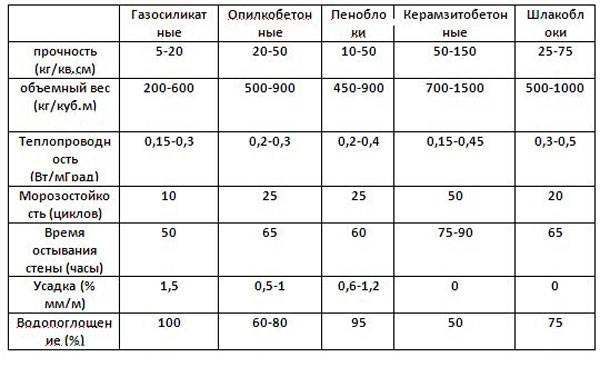
To calculate the required number of foam blocks for your shed, you need to know their size. The data are shown in the table.

Foam blocks can be laid out on a concrete solution, but it is better to use glue. The erection of the walls of the barn begins from the corners. A strip or slab foundation is suitable for such a capital structure. It is possible to install piles, but it will cost the owner dearly.
When all four corners are level and plumb, a rope is pulled between them. Wall laying is continued along the cord from the corners.It is important to observe the dressing of the seams in the rows, otherwise the structure will turn out to be wobbly.
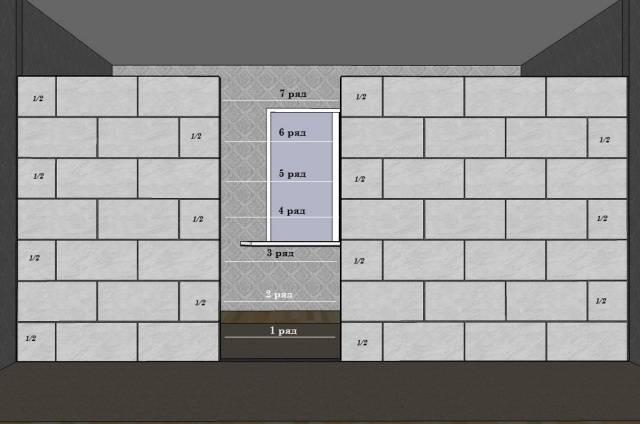
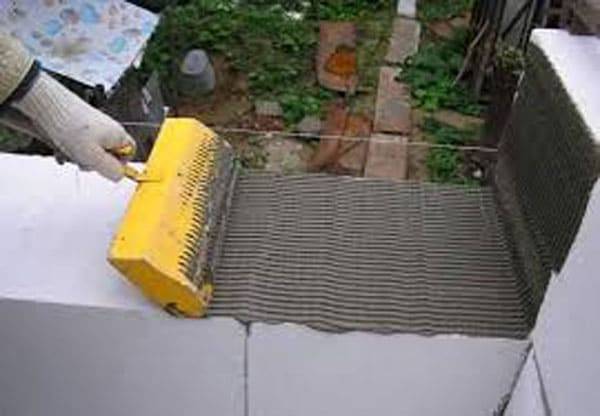
Glue or concrete mortar is applied with a notched trowel. The foam block should be lubricated liberally so that there are no areas without solution. Excess after laying the block is cleaned off with a trowel or even spatula.
The walls of the shed are driven out with a height of at least 2 m. Further, a strapping from a bar - Mauerlat - is laid around the entire perimeter. The rafter system of the shed or gable roof of the shed will be attached to it. The second version of the roof is more difficult to manufacture, but it allows you to organize an attic in the utility block for storing things.
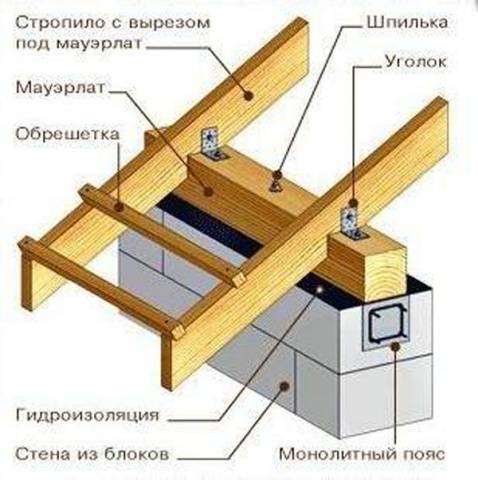
Waterproofing must be placed under the Mauerlat. On a large barn, a slate roof puts a lot of pressure on the walls. For its even distribution, it is often practiced on the upper row of walls to pour a monolithic reinforced concrete belt.
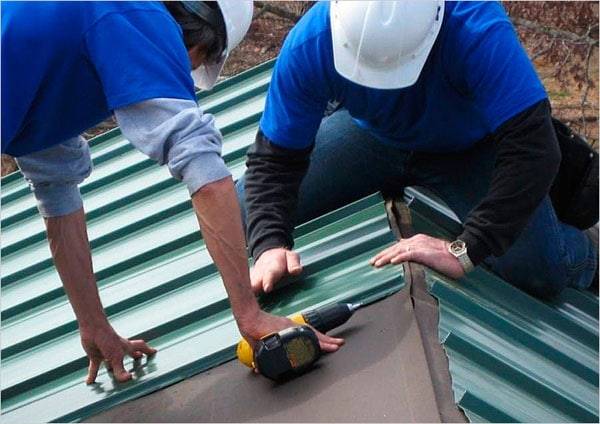
When the shed rafter system is installed, the crate is nailed, waterproofing and roofing are laid.
In conclusion, we suggest you look at a selection of photos of country sheds.

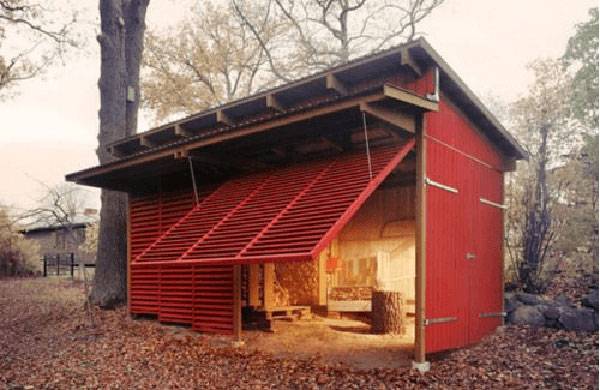
If you are creative, then the barn can be decorated so that it becomes the attraction of your site.


